Tuesday, September 24, 2013

Sweet and Spicy Garlic Tilapia over Black Rice


This is my first time making black rice. It has a slightly chewier consistency, almost like brown rice.  It really paired well with this Asian inspired dish. My hubby gave me the best compliment while eating it saying, “If this were served at PF Chang’s, I would get it every time”. 

Ingredients: 
1 package of mushrooms
1 medium onion

1 cup raw broccoli florets 

3 pieces of Tilapia

1 cup black rice

1 tablespoon butter
1 teaspoon sesame seeds
1 teaspoon sesame oil

Sweet and Spicy Garlic Sauce

¼ cup soy sauce
1 teaspoon garlic paste
1 teaspoon sriracha chili pepper sauce
1 teaspoon honey
1 teaspoon rice wine vinegar


Start your rice first because it will take about 20 minutes or so to cook. If you time it right, you can have your fish and veggies ready when the rice is finished cooking. 

1 - Start Rice by boiling water, adding a pinch of salt, then rice, bring to a boil, cover and simmer for 20 minutes on low. 

2 - Mix what will become the sweet and spicy garlic sauce .

3 - Place Tilapia in a foiled baking dish coated with cooking spray. Drizzle a couple of teaspoons of your mixed sauce over the fish along with a pinch of salt. Place a few small chunks of butter on top of fish. Broil at 550 for 12 minutes or until fish starts to look brown and crispy on top

4 - Chop up your onions and add them to a non-stick skillet that’s heated over medium high with your sesame oil.  Let the onions and sesame seeds cook for about 2 to 3 minutes while chopping up the remaining veggies.  


Add in the mushrooms and broccoli and keep the temperature at medium high, stirring the veggies constantly like you would stir-fry for another 5 minutes.  Add in your sauce and cook for 2 minutes over the same heat before turning it town to med low heat.  The sauce should thicken after about 2 more minutes and ready to serve over the rice.
Let me know if this recipe was easy for you to read and understand.  I could really use the feedback and would love to improve my blog.

Sunday, August 25, 2013

Fried Eggs Over Portobello's Stuffed with Creamed Spinach and Swiss Cheese


It’s a sip your coffee slowly kind of Sunday and I smell my mushrooms baking in the oven as I type this blog.  I haven’t had a chance to blog a lot lately.  I have a ton of new recipes that I need to put up and I plan on accomplishing that today. 

I'm swapping out carbs this morning and replacing them with mushrooms.

Recipe Follows:

3 large Portobello mushroom caps

3 eggs

3 pieces of Swiss cheese

One 9oz box of Pre-made creamed spinach. (you can make your own but this is a short cut)

Salt and Pepper to taste

Fresh Basil for garnish (optional)


Rub the Portobello with a little olive oil, salt and pepper

Top with creamed spinach mixture and one piece of Swiss cheese

Bake a 375 for 20 minutes or until mushroom is soft

*Tip* click on this link to see how you can prevent soggy mushrooms.


When there’s 5 minutes left in cooking time, fry your eggs in a sauté pan and then place on top of the Portobello. Garnish with fresh chopped basil


Thursday, August 1, 2013

Fried Eggs with Butternut Squash and Onion Hash


As I said before, I prefer a hot meal for breakfast and eggs over anything.  Using pre-cut, bagged butternut squash, I cut my prep time in half.  Cutting into a hard butternut squash is no easy feat, so this is the better way to go in my opinion.  I’m making a dish tonight with chicken sausage so I snagged one from the fridge and threw it in the pan.  The brand I like to use is Al Fresco and it’s all natural and “buffalo”, which I love! 

Ingredients

1 small yellow onion

Pam or olive oil to coast the pan

1 buffalo chicken sausage-casing removed.

½ bag of fresh pre-cut butternut squash

1 teaspoon garlic paste

1 cup fresh baby spinach leaves

Salt and Pepper

Toast is optional
 

In a sauté pan over med, heat coated pan and add garlic.  I diced my squash a little more so the pieces were smaller.  Throw in your sausage, squash and onion with a little salt and pepper and cook for about 5 minutes or until the mixture starts to lightly brown.  Make sure you break up the sausage as best you can into smaller pieces as you cook.  Cover the pan for 3 minutes so the squash is tender, then remove the lid and cook 3 minutes more or until the contents are crispy and caramelized.  Toss in your spinach and place the lid back on for 1 minute.  Once the spinach has wilted, mix in well with the squash and sausage.  Remove from pan and plate. 


Cook your eggs according to preference.  I love over easy eggs where the yolk is running and soaks in to a buttered piece of toast…yum!


Tuesday, July 30, 2013

Sun-dried Tomato and Garlic Tilapia


Tonight I wasn't in the mood for an elaborate meal so I turned on the broiler and grabbed one of my favorite spreads.   I don’t feel like I have to make everything from scratch but I try to.  Usually, spreads and sauces made fresh from my food processor just taste so much better than store bought products.   This is one of those exceptions though.  I found this spread in the produce section at Publix.  I put it in egg whites, on fish, chicken and it’s great with a little butter on toasted Italian bread. 


Sun dried Tomato and Garlic Tilapia

Turn on your oven to Broil

Pat the fillets dry and place on a coated baking pan.

Spread a large teaspoon of the California Sun-Dry Tomato and Garlic mixture on each piece of fish and broil for 12 to 14 minutes.  Fish should be slightly brown and crispy on the top when ready.  That’s it, that’s all.  This fish was amazing and tasted like I had marinated it overnight.

Monday, July 29, 2013

Green Olive Crusted Mahi Mahi


So last night I posted the Roasted Vegetables and here is what I paired them with.  Green Olive Crusted Mahi Mahi fillets.  You can make your own green olive paste consisting of pureed green olives, garlic, salt and pepper.  Or, you can sheet like I did and buy the pre-made kind. 


Turn oven on broil:

Place fish on a foiled baking sheet  Make sure to pat it dry before spreading the paste on it.  Spread the green olive paste evenly on the top of each fish.  I also took a piece of herb butter and stuck in right in between my fillets.


Place fish on the middle tray in the oven and broil for 10 to 12 minutes or until golden brown on the tops.

 After baking, remove from oven and squeeze fresh lemon juice over the Mahi. 


Sunday, July 28, 2013

Roasted Vegetables with Truffle Oil, Almonds and Applewood Smoked Sea Salt


I’m trying my best to eat clean this week as I move into my  second week of boot camp.  I loaded up my grocery cart with various veggies and a couple different cuts of fish.  Tonight we’re having Green Olive Crusted Mahi Mahi and the roasted veggie concoction I came up with.  I can smell it cooking in the oven as a write this blog and the smells are delightful.  I'm new to cooking with white truffle oil so I’ve been trying a lot of different things with it.  This is also the first time I’ve ever used the smoked sea salt and I’m anxious to see how it turns out.   The salt is Pacific flake sea salt, smoked over real Applewood from the Yakima Valley in Washington State.  I found it randomly near the specialty cheeses at Publix and I was intrigued by its unique description.  The bottle says it has a smoother flavor than most salts and can be used during cooking or as a finishing salt.    
 

I pre-heated my oven to 375 degrees and sprayed my large Stoneware Pan with a little Pam.  After chopping up my veggies, I drizzled a little white truffle oil over them, raw slivered almonds and 2 pinches of the salt and distributed evenly.  Bake for 45 minutes, tossing ever 10 minutes or so to prevent burning.  They should look brown and caramelized when done cooking.

 
Ingredients

12 to 15 Brussel Sprouts, trimmed and halved

1 Large Yellow Onion, cut into wedges

1 extra Large Carrot, chopped

1 teaspoon Applewood Smoked Sea Salt

1 teaspoon White Truffle Oil

¼ cup Slivered Raw Almonds

Pepper to taste


Friday, July 26, 2013

Squash Hash with Poached Eggs


Morning Everyone!  I completed my first week of 5:45am boot camp and I’m feeling accomplished.  I’m also feeling sore but I know it will all be worth it in the end.  Because I’ve been getting up earlier, I’ve had more time to write on my blog and that too makes me feel good too!

 I’m not much of a power bar, cereal kind of girl when it comes to my breakfast.  I love my eggs and a hot meal in the morning.  If you pre-cut your veggies the night before, you can whip this up in less than 10 minutes. 

Start by boiling some water with a little vinegar in it.  If you’ve never poached an egg before, check out this easy instructional from Fabio Viviani.

  http://shine.yahoo.com/shine-food/easy-secrets-cooking-eggs-fabios-eggs-benedict-153800472.html 

He’s cooking up one of my favorite breakfast meals, Eggs Benedict.  I watched this video a year or so ago and it really helped me to master poaching an egg and making hollandaise sauce. 

I used zucchini squash and patty pan squash along with some diced yellow onions to make my hash.  Patty Pan squash is a summer squash that has a similar taste to acorn or spaghetti squash.  You can ask for it at your local farmers market from summer to early August.
 

In a non-stick coasted small pan, sauté your onions and squash with a 1/2 teaspoon of garlic salt and pepper.  Cook for 5 minutes while eggs are also cooking in a separate pot.  I served this dish with herb buttered toast and topped my eggs with some fresh Thyme.   
 

Wednesday, July 24, 2013

Over Easy Veggie Delight

I’m up and at em this morning continuing my first week of 5:45am boot camp.  Yes, I’m crazy!  I feel great aside from the soreness and I’m extra motivated this week to focus on my blog.  I really wasn’t hungry when I first got home so I decided to give breakfast a little more effort and here's what I came up with.

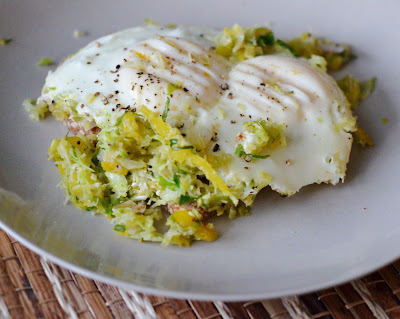
Over Easy Veggie Delight


First break out the Mandolin Slicer which we’ve talked about before.  Use the blade for shredding and get to work!  Be careful not to cut yourself by using the protective hand held piece when slicing smaller foods.  I shredded the pepper, leeks, and brussel sprouts first and saute them in a coated pan with a little garlic paste.  Cook for 1 minute so you can keep as many nutrients from the veggies as possible.  Push veggie mixture to the side,  crack in 2 eggs and cover.  Cook for about 3 minutes for an over easy egg.  While the eggs are cooking, toast your bread and spread a little bit of herb butter on it.  (gotta have a little fat)  I used the Kerry Gold Herb-ed Butter.  It is my absolute favorite brand of butter.

Ingredients:


 2 Brussel Sprouts
 1 Mini Yellow Pepper


 1 inch piece of a leek

1 teaspoon garlic paste

2 eggs

1 slice of Sesame Seed Sprouted Grain Toast

1/2 teaspoon butter


Enjoy!

Tuesday, July 23, 2013

Tuna Salad with Peas and Quinoa Pasta


In my pantry, you can usually find a can of tuna and some pasta at all times.  As a child I remember my mother making this dish a lot (probably because it was cheap eats)  Sometimes the best things in life are nearly free, right?  This whole meal to feed a family would cost under $8 and fills you up!  I spruced it up from the original recipe with a little dill and white truffle oil.

Tuna Salad with Peas and Quinoa Pasta

Ingredients:
2 Can Solid White Albacore Tuna in Water
I box Ancient Harvest Quinoa Shells
1 Small Bag of Frozen Peas-Defrosted
1 Medium Yellow Onion
3 Tablespoons Reduced Fat Mayo with Olive Oil
1 Teaspoon Lemon Juice
1 Teaspoon White Truffle Oil
Dash of Cayenne Pepper
1 Teaspoon Fresh or Dried Dill Weed
Salt to Taste


Cook Pasta according to box directions and let cool.  Mix all ingredients together and refrigerate for at least an hour to chill.  Top with additional dill before serving (optional)
Where to find White Truffle Oil:  I bought mine on Amazon and it was $14.50 with free shipping.  The good news is that a little goes a long way so the cost is totally worth it.
What else White Truffle Oil is used For:  I put this stuff on everything!  I jazz up a can of soup, drizzle it on cheese and crackers, veggies, potatoes, and use in pasta. 


Mashed Turnips with White Truffle Oil
Here are a few links to other recipes that contain White Truffle Oil( these are not my recipes): http://www.melangery.com/2012/11/mashed-turnip-with-white-truffle-oil.html

Cauliflower Soup with White Truffle Oil
White Truffle Parmesan Fries

Monday, July 22, 2013

Grilled Chicken Breasts, Topped with Red Pepper Jelly and White Cheddar Cheese


Hi folks!  It’s been quite some time since my last blog.  Have no fear; I haven’t stopped experimenting or taking photos of my food.  I just haven’t had the time to write it all down.  I made this dish back in May actually and it happens to be the last time I grilled anything. (need more propane-too lazy to refill)  The last few months have been a whirl wind.  Between turning 30, wedding events for friends, singing gigs and vacations, I have just dropped the ball regarding this blog.  I can’t wait to tell and show you all of the things I’ve made and places I’ve visited since my absence.  So…… here we go:


I recently discovered red pepper jelly as you may have noticed from past recipes.  It’s pretty much the bee’s knees :) it’s great on toast, crackers with cheese, omelets, wraps, sandwiches and now Grilled Chicken Breasts topped with Red Pepper Jelly and Cheddar Cheese

Ingredients:

2 Boneless Skinless Chicken Breasts

2 tablespoons Red Pepper Jelly

2 Thick Slices of Reduced Fat White Cheddar Cheese

¼ cup Reduced Sodium Soy Sauce

¼ cup Olive Oil

¼ cup Lemon Juice


First I start by marinating my chicken for 1 hour with equal parts of each:  soy sauce, lemon juice and olive oil.  I only grilled 2 breasts so I used about a ¼ cup equal parts and would double the amount when doubling the chicken.  The acidity of the lemon juice helps to tenderize the meat before grilling. 

Ok, now we’re ready to throw it on the grill!

Pre-heat grill over high heat.  Spray each side with non-stick oil and grill for about 4 to 5 minutes on each side.  The internal temperature should be at least 165 degrees F.  Turn off the grill but leave the chicken on the rack and quickly spread the jelly on each breast and top with cheese.   Close the lid and wait for the cheese to melt.  The chicken is continuing to cook so you don’t want to leave it on the grill for to long.  The chicken will be piping hot and by shutting the grill lid it allows the cheese to melt faster.

 Now we’re ready to eat :)  I served this dish with a Simple Zucchini salad that you can find on my blog from back in June.   Bon appetite!

Monday, June 3, 2013

Butternut Squash Mash with Gorgonzola


Tonight we threw a couple steaks on the grill and this was a great alternative to mashed or baked potatoes.  I used a bag of organic frozen butternut squash which I love because it's much quicker than chopping and peeling.  I steamed the squash in the bag while I sautéed pureed garlic in a small pot with a little olive oil on low. I added in some ready-made chopped bacon, Gorgonzola and salt and pepper.  Mix it up with a spoon and cook for about 3 minutes.


Sunday, May 19, 2013

Simple Zucchini Salad (Raw foods)


Break out your mandolin for this healthy and simple side dish. 

Ingredients

2 large zucchini’s

½ cup chopped onion

2 tablespoons olive oil

3 tablespoons red wine vinegar infused with garlic

Pinch of salt

Garnish with dried thyme
 

Saturday, April 27, 2013

Buffalo Chicken Sausage Flatbread with Butternut Squash, Sweet Peppers Pineapple and Rosemary


Heat grill to 350 degrees.  Remove chicken from casing and add hot sauce.  Mix well so that the chicken absorbs all the sauce.  Cover a large grill basket with foil and add chicken sausage, peppers, squash, rosemary and pineapple.  Season lightly, mix and cover the contents with the foil.  Close the grill and cook for 10 minutes.  After the first 10 minutes, uncover and turn up the grill to 400 degrees.  Cook for 10 minute more or until squash is tender.  During the last few minutes of the cook time, place olive oil drizzled Naan bread directly on grill for one minute per side.  Plate the bread and top with the grilled chicken mixture.  Garnish with 5 to 6 pieces of fresh Dole arugula.

I hope you get a chance to try out this recipe.  The sweetness of the pineapple and peppers goes nicely with the spice of the sausage and nuttiness of the squash. 
Ingredients:
1 small can DOLE crushed pineapple in 100% juice-drained

1/2 cup DOLE fresh bagged Arugula

1 shallot

1 cup diced raw butternut squash

1 package garlic Naan bread

1/2 cup chopped mini sweet peppers

2 sprigs of fresh rosemary-chopped

2 chicken sausage links

2 tablespoons hot sauce

1 teaspoon olive oil

All-purpose seasoning to taste

Recipe serves 3 to 4

Prep Time-8 minutes

Cook time 20 minutes


Wednesday, April 24, 2013

Pearl Couscous, Butternut Squash and Kale in a Creamy Red Pepper Sauce (Dairy Free )


Hey there everyone…….last night I made up something new for a recipe contest from godairyfree.org 

I had to use one of the So Delicious Products and I choose to use their Unsweetened Coconut Milk

The grand prize winner will get $500 to spend at William Sonoma which is one of my favorite foodie stores!  There are two specific requirements to follow with this submission: 

1.       Must be dairy-free

2.       Must me vegan

So here it is, my Dairy Free Vegan -Pearl Couscous, Butternut Squash and Kale in a Creamy Red Pepper Sauce

I am no stranger to dairy-free cooking due to the fact that my hubby is lactose intolerant. Im Not really sure what chemicals are in the milk these days, so I’m happy to join him in his “dairy-free” journey.  I used Israeli Pearl Couscous which contained no animal products, fresh veggies and finished it off with a creamy roasted red pepper sauce.  Unlike other couscous, pearl couscous has the consistence of pasta. I love pasta, but it’s not the best thing for you.  Israeli Couscous is high in fiber and contains a significant amount of vitamin C. 


Ingredients:

1 box Israeli Pearl Couscous

1 cup butternut squash-I baked my own and cut it up.  It’s much easier to buy it pre-cut and uncooked.

4 large pieces of Kale- make sure you remove the stems

1 small yellow onion

1 1/2 teaspoons garlic paste

6 larger pieces of jarred roasted red peppers

1/2 cup So Delicious Unsweetened Coconut milk

Dash of cayenne pepper

Drizzle of olive oil

Salt to taste

Serves 2 to 3

Prep Time 8 minutes

Cook time 15

Directions:

I used some already cooked cubed butternut squash I had handy in my freezer.  I would suggest cooking the squash alone a head of time for this recipe and then cut into cubes.  Be careful not to overcook the squash because it will get mushy.  I baked mine at 350 for 15 minutes, let it cool and cut it up.

First, follow the cooking instructions on the box of the couscous.  Drizzle a little olive oil in a small pot, add garlic and cook over medium heat for 1 minute.  Add the peppers and cook another 3 minutes.  Transfer to food processor and add in your coconut milk.  Puree until smooth and transfer back to pot, add cayenne, salt and simmer until couscous is done cooking.  At this point we are only about 10 minutes into our couscous cooking, which took about 12 to 15 minutes.  We can now sauté the onion, kale and butternut squash together with a little more olive oil and a pinch of salt.   Cover, and cook over medium low heat for 4 to 5 minutes.  Last step is to plate your food, couscous first, top with squash onions and kale, drizzle with your creamy roasted red pepper sauce.

Enjoy!